Cloning Windows Server 2012 Domain Controllers on vSphere 5
Matt Liebowitz
- 5
- 2818
Microsoft introduced a lot of virtualization awareness in Windows Server 2012, particularly for domain controllers. They are, for the most part, considered virtualization “safeguards” in that they prevent against some of the classic problems of virtualizing domain controllers. Historically things like virtual machine snapshots, restoring from virtual machine image backups, or cloning domain controllers was either difficult or impossible. With the introduction of the VM-GenerationID it is now safe to use virtual machine snapshots and even clone existing domain controllers.
How Does It Work?
The VM-GenerationID is a unique identifier exposed to the virtual machine by the hypervisor that helps to prevent issues with domain controller snapshots, cloning, etc. When virtualizing Windows Server 2012 on vSphere, the VM-GenerationID is included as part of the virtual machine’s VMX file in the attribute vm.genid. This attribute is present on all Windows Server 2012 VMs, not just those that are domain controllers. See below for a few lines from a VMX file of a Windows Server 2012 VM with the vm.genid value highlighted.
evcCompatibilityMode = "TRUE"
softPowerOff = "FALSE"
vm.genid = "-5266020153200197717"
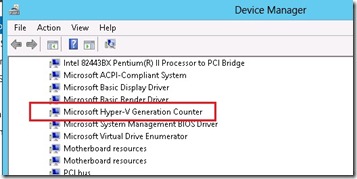
You need to be running a version of vSphere that supports VM-GenerationID. That includes vSphere 5.0 Update 2 or vSphere 5.1 (if running vCenter 5.1, the ESXi hosts have to be running at least vSphere 5.0 Update 2). You can tell if you’re running a compatible hypervisor by looking for “Hyper-V Generation Counter” in Device Manager of a Windows Server 2012 VM.
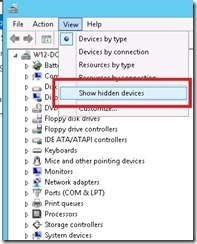
You’ll need to show hidden devices in Device Manager to see it. Select View\show hidden devices:
Then expand System Devices and you’ll see Hyper-V Generation Counter.
When a Windows Server 2012 VM is promoted to a domain controller, the unique value of the VM-GenerationID is stored in the msDS-GenerationID attribute on its copy of the Active Directory database. Open up Active Directory Users and Computers, select View\Advanced Features, and then right click on your domain controller and select Properties. You can see the msDS-GenerationID attribute in the Attribute Editor tab. Note that since this value is not replicated to other domain controllers, the value will appear as "<not set>” if you try to look at the attributes of a different domain controller.
Prerequisites And Overview
Now that we’ve confirmed that VM-GenerationID is supported how do we go about cloning our domain controllers? It’s really a very simple process, though you’ll see it doesn’t work exactly like cloning other virtual machines. First, the prerequisites:
1) The domain controller running the PDC Emulator role must be running Windows Server 2012 and must be online during the process. It isn’t necessary for this domain controller to be virtualized but it certainly can be.
2) The hypervisor needs to support VM-GenerationID. Though we already stated this, it’s important to re-state it in case you have a cluster with a mix of versions (or are in the process of upgrading). If you’re using DRS in fully automated mode then vCenter will automatically pick the best host to power up your cloned DC and if that host does not support VM-GenerationID then your clone will fail. Yet another reason to keep all hosts in a cluster at a consistent build.
Now, on to a high level overview of the process:
1) Promote a server to a domain controller that will be used primarily for cloning. This domain controller should not have any FSMO roles and should not be the primary/secondary DNS server for any servers on your network. This step is not absolutely required, but you’ll see why I’m recommending this as we go through the cloning process.
2) Add the domain controller you just created to the “Cloneable Domain Controllers” group in Active Directory (located under the Users OU).
3) Create a list of “allowable” software on the DC you’re cloning.
4) Create a configuration XML file that specifies the settings for the new domain controller.
Preparing the DC for cloning
At this point you’ve promoted your domain controller and made sure it has no FSMO roles or acts as primary DNS for any servers. Now it’s time to add the VM to the Cloneable Domain Controllers group in AD.
It is recommended that you remove the DC from this group after you’re finished cloning.
Creating the Allowable Applications List
Windows maintains a list of the applications and services that are allowed to be running on a domain controller that is used as the source for a clone. These are mostly familiar Windows services, and you can view the full list at c:\Windows\System32\DefaultDCCloneAllowList.XML. A Windows Server 2012 domain controller cannot contain any applications or services that may not function properly if the server is cloned. It is intended to catch things like DHCP services that need to be authorized in AD and are better installed manually than cloned. In order to see if any of these applications exist on the server, issue the following PowerShell command:Get-ADDCCloningExcludedApplicationList Below is the output of that command on a domain controller in my lab:
PS C:\> Get-ADDCCloningExcludedApplicationList
Name Type
—- —-
Microsoft Visual C++ 2008 Redistributable – x64 9.0.3072… Program
VMware Tools Program
Microsoft Visual C++ 2008 Redistributable – x86 9.0.3072… WoW64Program
VMTools Service
vmvss Service
WLMS Service
You’ll notice some familiar applications on there, most notably the components of VMware Tools. We’ve known for years that VMware Tools is fully compatible with cloning all virtual machines, so we simply need to “allow” these applications to be present on our domain controller before cloning by generating an XML file called CustomDCCloneAllowList.xml. To generate the list, simply issue the same command with the –GenerateXML switch as shown below. Note that the XML file will be created wherever you’ve stored your Active Directory database, or C:\Windows\NTDS by default.
PS C:\> Get-ADDCCloningExcludedApplicationList -GenerateXml
The inclusion list was written to ‘C:\Windows\NTDS\CustomDCCloneAllowList.xml’.
Creating the Clone Configuration File
The next (and last) step you’ll need to perform is to create an XML file that contains the configuration details of your new domain controller. This includes the new domain controller’s name, networking information, and AD Site (if required). You can create the XML file using the PowerShell command New-ADDCCloneConfigFile. As you can see below, you pass the necessary configuration parameters to the New-ADDCCloneConfigFile cmdlet to create the XML file:
PS C:\> New-ADDCCloneConfigFile -Static -IPv4Address "192.168.1.153" -IPv4DNSResolver "192.168.1.140" -IPv4SubnetMask "255.255.255.0" -IPv4DefaultGateway "192.168.1.1" -CloneComputerName "W12-DC5" -SiteName "NJ"
If everything worked you’ll see output similar to what you see below and a DCCloneConfig.xml file will be created in the same directory as your AD database:
What if you want to clone multiple domain controllers instead of just one at a time? You can leave out all of the configuration information above and just provide the DNS server for the domain:
PS C:\windows\system32> New-ADDCCloneConfigFile –IPv4DNSResolver “192.168.1.120”
If you do not choose a server name for the clone, the name of the new domain controller will match the source domain with “-CLnnnn” added to the name. In our example, the source DC is named W12-DC4 so the new domain controller would be named W12-DC4-CL0001. It is certainly possible to rename a domain controller after it has been promoted but it is a manual process that is different than renaming any other server.
You’ll need to create a new DCCloneConfig.xml file each time you want to clone the domain controller. The file is not reusable and becomes invalid after a reboot of the source domain controller whether a clone operation has occurred or not.
Clone the VM
At this point you’re ready to clone the source domain controller. You’ll need to power off the source domain controller before attempting to clone it. Remember I mentioned above that you’ll want to create a dedicated DC for cloning? This is why – even though cloning can be quick (especially with VAAI enabled arrays) it isn’t a great idea to take down a DC that other servers and workstations use as a primary or secondary DNS server or worse, one that has FSMO roles. If you try to clone your DC without shutting it down first you’ll end up with a cloned DC that does not get customized and is an exact replica of your source DC.
Simply clone the virtual machine as you would any other VM that you clone, with one exception. Do not try to apply a customization specification to customize the cloned VM. The customization information is contained within the DCCloneConfig.xml file, so trying to use a guest customization from vSphere will result in a VM that does not boot. I’m going to experiment with this a bit more but my initial testing with customization specifications was unsuccessful.
After the clone is completed, power on both the source domain controller as well as the newly cloned DC. The cloning customization process will happen automatically.
That’s all there is to it! Now you’ve got a new fully functional cloned domain controller.
Have you tried out Windows Server 2012 yet? I honestly believe that if people could look past the change in user interface they would see that Windows Server 2012 offers many significant improvements to the Windows Server platform. It didn’t take me long to get used to the new interface and really enjoy working in Server Manager as a central management tool. Give it a try!
5 thoughts on “Cloning Windows Server 2012 Domain Controllers on vSphere 5”
Leave a Reply Cancel reply
This site uses Akismet to reduce spam. Learn how your comment data is processed.


That is the best thing I have read all week! I’ve got a Windows AD upgrade due and that post has probably saved me days of planning and effort.
You mention snapshots are supported, does that mean we can leverage snapshots with Windows 2012 DC’s and roll back to a snapshot without AD refusing to replicate due to the replication sequence ID being in the past?
Hey Craig,
Thanks for the comment and I’m glad the post helped!
Yes, snapshots are now supported on domain controllers. In fact the process by which a domain controller behaves when reverted to a snapshot is identical to when it is cloned. The major difference is the presence of the DCCloneConfig.xml file. Without that file it assumes it is a snapshot and puts in place the safeguards to prevent USN rollback and replication issues.
So yes – you can take a snapshot of a domain controller and then revert it back without causing issues with domain replication. Of course any changes made to Active Directory won’t be rolled back, but your DC will be protected. Also make sure that you’re on a supported hypervisor. I list out the steps in here to verify that the appropriate setting is in the VMX file of the VM. Don’t try this on a version of vSphere that doesn’t support VM-GenerationID or you’ll probably have a very unhappy day. 🙂
Hope this helps!
Matt
Thanks for this post Matt,
Can you explain the following:
I have a (non-production) Windows 2012 R2 on an ESXi 6.0
When cloning this VM, I noticed that the vm.genid value is changed, but the DC works fine.
In one occasion, which I cannot reproduce I got Event ID 2170
A Generation ID change has been detected.
Generation ID cached in DS (old value):%1
Generation ID currently in VM (new value):%2
-VM is cloned when its suspended
-Like mentioned, cannot reproduce even when powering off cloned vm, removing the genid from the vmx and then powering on
-the msDS-GenerationID attribute is missing
Any idea what triggers this check?